Physical assessment - Cranial nerves: Nursing
Physical assessment - Cranial nerves: Nursing
Clinical Nursing Skills & Technique
Clinical Nursing Skills & Technique
Notes
| PHYSICAL ASSESSMENT - CRANIAL NERVES (CN) | ||
| KEY POINTS | NOTES | |
| DEFINITION |
| |
| GETTING STARTED & METHODS OF ASSESSMENT |
| |
| CN I |
| |
| CN II |
| |
| CN III |
| |
| CN III, IV, & VI |
| |
| CN V |
| |
| CN VII |
| |
| CN VIII |
| |
| CN IX |
| |
| CN X |
| |
| CN XI |
| |
| CN XII |
| |
| NURSING IMPLICATIONS |
| |
Transcript
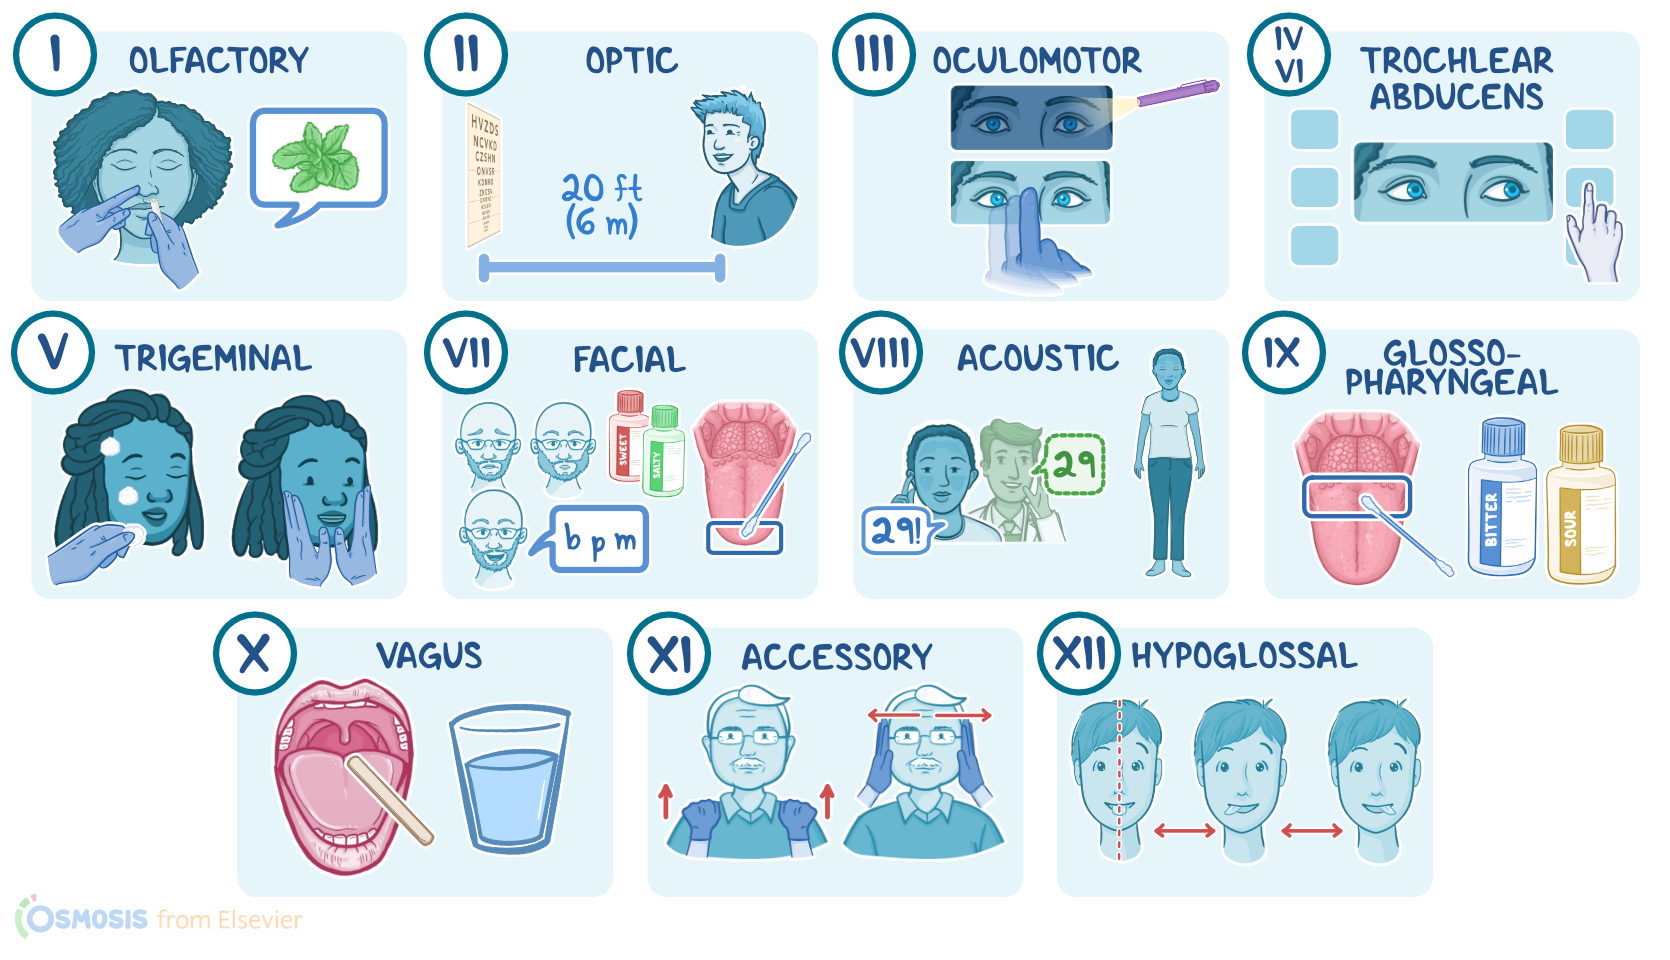
Assessment of the cranial nerves should be completed as part of a comprehensive assessment, like during a routine physical exam, or as part of a focused exam if a client is experiencing neurological issues like a drooping eyelid or trouble swallowing. Examination of the 12 pairs of cranial nerves provides information about the client’s sensory and motor function of the head, neck, and torso. Let’s review the process of completing a cranial nerve assessment.
Okay, the supplies you’ll need for your assessment include a penlight; a sample of an odor that is easily identified like an alcohol pad, peppermint, or coffee; a cotton ball; a cotton swab; sweet, sour, salty, and bitter taste solutions, a Snellen eye chart, a tongue blade, and gloves. Then, prepare for the exam by ensuring your client is in a comfortable position, that your hands are warm, and that the temperature in the room is comfortable. Provide privacy by closing the door and curtains.
Before getting started, explain the procedure to your client and be sure to answer any questions they might have before obtaining verbal consent. Then, perform hand hygiene and collect your supplies.
Methods of assessment for cranial nerve evaluation include inspection, mainly watching to see if the client is able to perform the requested tasks, and palpation.
Okay, let’s start with cranial nerve I, the olfactory nerve. You can test the function of this nerve by asking your client to close their eyes, occluding one of the nares, and holding the sample about 6 inches from the open nare, and asking them to identify the odor. Repeat with the opposite nare. They should be able to correctly identify the odor. Clients who cannot identify the odor might have a partial or complete loss of smell, known as anosmia.
Next is cranial nerve II, also known as the optic nerve, which is responsible for visual acuity, or how your client can see. If you are using a wall-mounted Snellen chart, position your client 20 feet or 6 meters from the chart. Then, ask your client to cover one eye, and read the letters on the lines until the letters become too small for them to read. Repeat with the other eye. You’ll record their visual acuity as a fraction, where the numerator indicates the distance your client is from the chart, and the denominator indicates the distance at which a normal eye can read the line on the chart. For example, 20/40 vision means that the client can read at 20 feet what the average client can read at 40 feet. In other words, the larger the denominator, the worse the vision. Vision that’s not able to be corrected to better than 20/200 means the client is legally blind.
Okay, moving on to cranial nerve III, the oculomotor nerve, which is responsible for pupillary constriction and dilation, as well as elevation of the eyelid. Begin evaluating this nerve by turning down the lights to allow the pupils to dilate. Then, shine your penlight directly into one eye, observing for constriction of the pupil. At the same time, assess for a consensual response, meaning, the opposite eye will also constrict along with the illuminated pupil. Repeat this assessment on the other eye.
You can check for accommodation by asking your client to focus on a distant object, which will dilate the pupil. Then, move your finger to about 8 to 10 cm, or 3 to 4 inches, away from their nose and ask them to focus on your finger. Normally, you should note pupillary construction, and inward rotation of the eyes, meaning their eyes may cross slightly. A gradual loss of accommodation with age is called presbyopia. Lastly, observe your client’s eyelids. If one of the upper eyelids droops and partially covers the eye, ptosis is present, which may be due to neuromuscular weakness from conditions such as myasthenia gravis or damage to cranial nerve III.
Now, you can check the extraocular movements, or EOMs, by testing the function of cranial nerves III, or the oculomotor nerve; IV, the trochlear nerve; and VI, the abducens nerve. To do this, stand in front of your client, hold your index finger about 12 to 16 inches away from your client’s face at the level of their nose, and instruct them to keep their head still while they follow your finger with their eyes as you move through the six cardinal fields of gaze. During the test, observe for smooth, symmetrical movement of the eyes. Be sure to stop for 1 to 2 seconds at each extreme of gaze to observe for nystagmus, or a repetitive jerky eye movement, which can be a normal finding at this end point or an indication of a weakness in the extraocular muscles.
Next up is cranial nerve V, the trigeminal nerve, which consists of three branches, ophthalmic, maxillary, and mandibular divisions, and supplies sensory and motor innervation to the face. To test sensation, take a wispy piece of cotton and instruct your client to close their eyes. Lightly brush the cotton over the anterior scalp, to test for the ophthalmic branch; over the cheek, to test for the maxillary branch; and jaw, to test for the mandibular branch; and ask them to tell you each time they feel the cotton touch their face. Repeat the process on the opposite side of their face.
To test for motor function, observe their face atrophy and fasciculation, or muscle twitches. Then, palpate the muscles over the jaw as they clench their teeth. Expect the muscle tone over the face to be symmetric and without fasciculation. Weak or absent contraction is an unexpected finding. Pain is an indication of trigeminal neuralgia.
Sources
- "Seidel's Guide to Physical Examination" Mosby (2017)
- "Physical Examination and Health Assessment" Saunders (2019)