Physical assessment - Heart and neck vessels: Nursing
Notes
| PHYSICAL ASSESSMENT - HEART AND NECK VESSELS | ||
| KEY POINTS | NOTES | |
| DEFINITION |
| |
| GETTING STARTED |
| |
| ANATOMICAL LANDMARKS |
| |
| METHODS OF ASSESSMENT |
| |
| INSPECTION |
| |
| PALPATION |
| |
| AUSCULTATION |
| |
| NURSING IMPLICATIONS |
| |
Transcript
Assessment of the heart and neck vessels should be completed as part of a comprehensive client assessment or as part of a focused exam if the client is experiencing issues that might be related to the function of the heart, like chest pain or shortness of breath. Let’s review the process of completing an assessment of the heart and neck vessels.
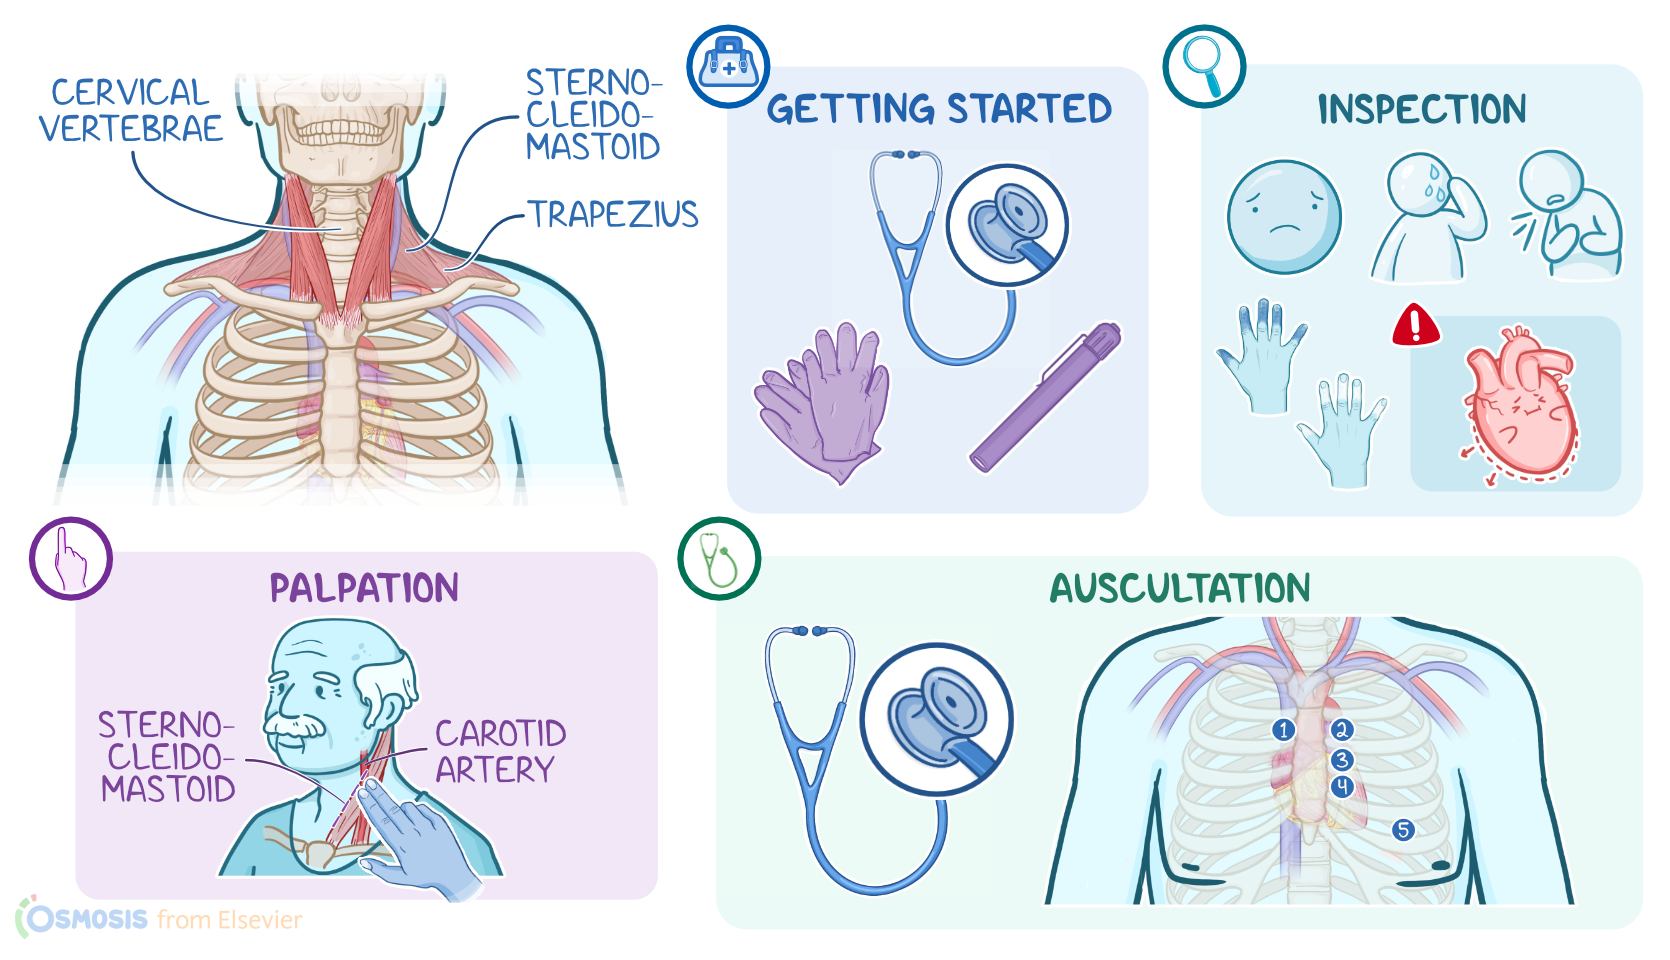
Okay, the supplies you’ll need for your assessment include a stethoscope with a diaphragm and bell, gloves, and a good source of light. Then, prepare for the exam by ensuring your client is in a comfortable position, that your hands and stethoscope are warm, and that the temperature in the room is comfortable. Provide privacy by closing the door and curtains, properly draping your client, and only exposing areas of their body as needed to perform your examination.
Before getting started, explain the procedure to the client and be sure to answer any questions they might have before obtaining verbal consent. Then, perform hand hygiene and collect your supplies.
Now, locating the anatomical landmarks of the heart and neck vessels will guide placement of your hands and equipment. The neck is located between the clavicles and sternum and the base of the skull. It is supported by the cervical vertebrae, ligaments, as well as the sternocleidomastoid and trapezius muscles.
The carotid arteries are located on either side of the neck, behind the sternocleidomastoid muscle. The heart is positioned behind the sternum in the chest cavity, and is about the size of a clenched fist. When the client is upright, the top of the heart is called the base and the bottom of the heart is called the apex. The point where the apex reaches its farthest both laterally and inferiorly is called the point of maximal intensity, or PMI. The PMI usually rests at the midclavicular line at the 5th or 6th intercostal space.
Methods of assessment for the heart and neck vessels include inspection, palpation, and auscultation. Since this exam will require the client to move into various positions, you can avoid client fatigue and reduce the time it takes to complete your assessment by completing all necessary elements of the assessment in one position before requesting your client change their position.
Let’s start with inspection. With your client in a seated position, observe them for any signs of distress including obvious discomfort, diaphoresis, shortness of breath, or cough, which could indicate problems with cardiopulmonary function such as valve dysfunction or heart failure.
Then inspect your client’s skin and mucous membranes for indications of poor perfusion, such as cyanosis, or a bluish discoloration, pallor or paleness, as well as cool skin.
Next, inspect the neck for symmetry, pulsations, and jugular venous distention, or JVD. Then, expose the chest wall, and look for symmetry and configuration of the chest. Lastly, inspect the surface of the chest for lifts or heaves, which are when the chest wall has a pronounced lifted appearance since this can be a sign of right-sided heart enlargement.
Okay, let's move on to palpation. Using two fingers, begin by locating the carotid artery in the neck, along the margin of the sternocleidomastoid muscle. Palpate for rate, rhythm, strength, and symmetry. Be sure to palpate only one carotid artery at a time, since compression of both carotids simultaneously will restrict blood flow to the brain and may cause fainting.