Physical assessment - Thorax and lungs: Nursing
Introduction0:00–0:29
Assessment of the thorax and lungs should be completed as part of a comprehensive assessment, like during a routine physical exam, or as part of a focused exam if a client is experiencing respiratory issues like shortness of breath, cough, or chest discomfort.
Examination of the thorax and lungs gives the nurse information about the movement of air and gas exchange. Let’s review the process of completing thorax and lung assessment.Okay, the supplies you’ll need for your assessment include a stethoscope, a washable pen or marker, a centimeter ruler, tape, drapes, and a good source of light.
Getting Started0:29–1:14
Then, prepare for the exam by ensuring your client is in a comfortable position, that your hands and stethoscope are warm, and that the temperature in the room is comfortable.
Before getting started, explain the procedure to your client and be sure to answer any questions they might have before obtaining verbal consent.
Then, perform hand hygiene and collect your supplies.Now, locating the anatomical landmarks of the thorax and chest will help guide the appropriate placement of your equipment and hands throughout your assessment.
Anatomical Landmarks1:14–2:09
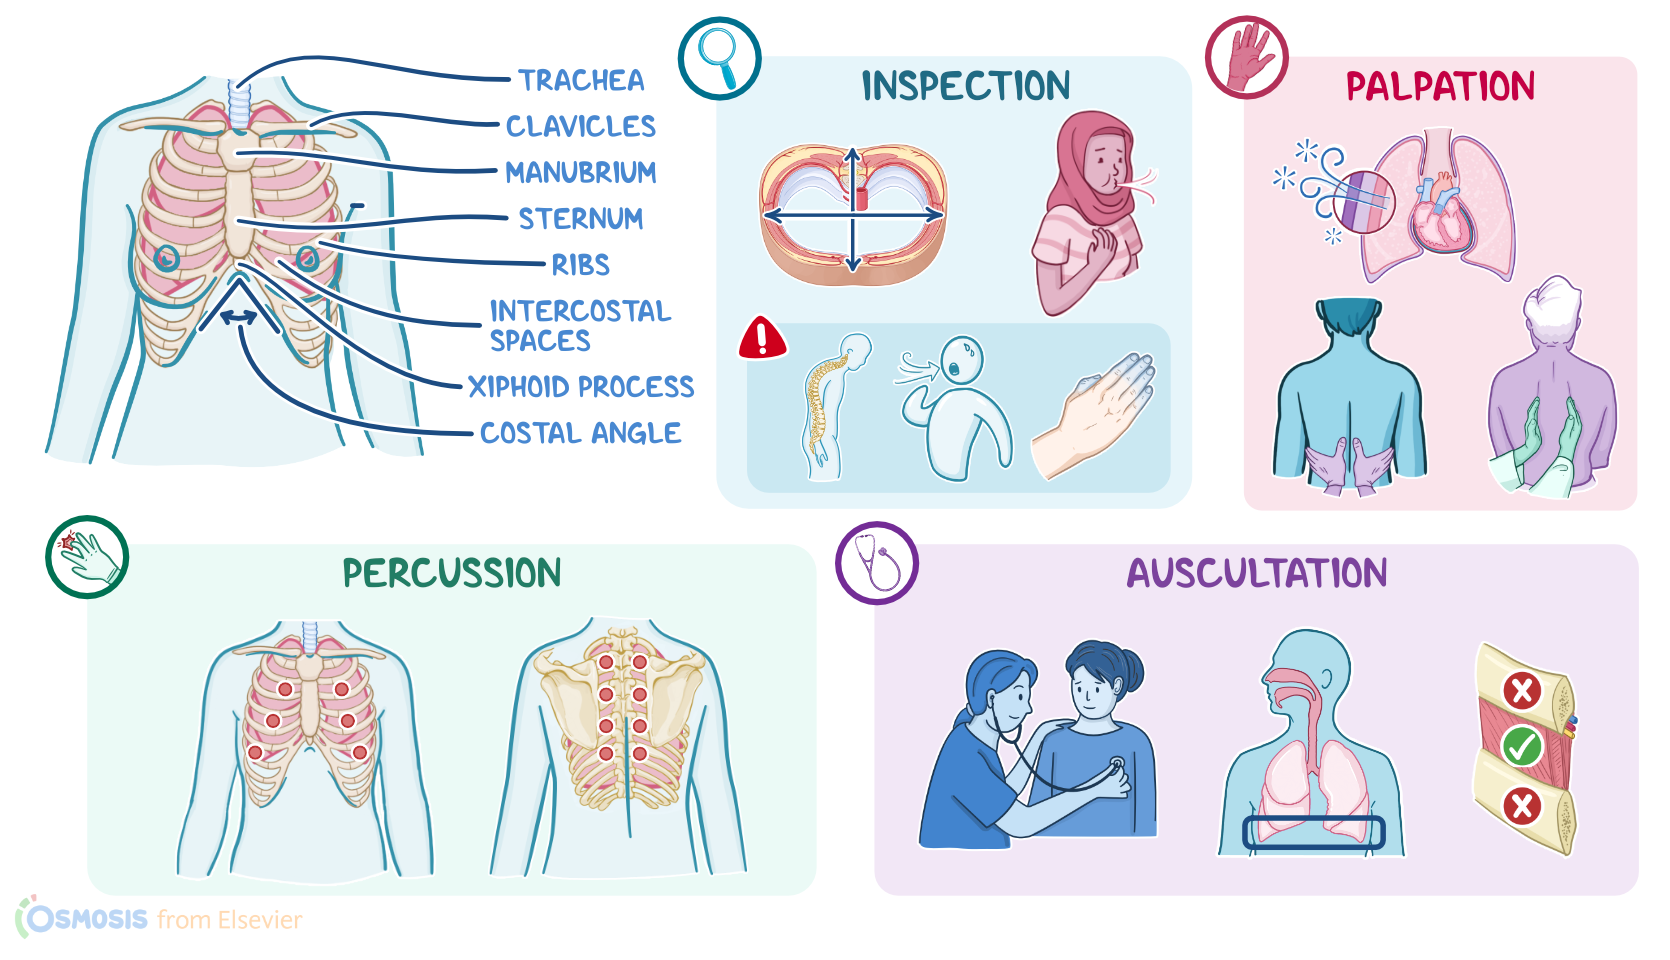
The thorax can be divided into the anterior chest and posterior chest. Commonly used anterior landmarks include the sternum, clavicles, manubrium, xiphoid process, the ribs and intercostal spaces, and trachea, as well as the costal angle, which is made up of the the costal margins just below the xiphoid process.
The chest can be further divided into sections using the midsternal line, a vertical line that runs down the middle of the sternum; and the right and left midclavicular lines, which are parallel to the midsternal line and run from the middle of each clavicle to around the 6th intercostal space.
Posteriorly, the landmarks include the scapulae and thoracic spine. These lines are parallel to the spine and travel through the middle of the scapulae.
Now, methods of assessment for the thorax and lungs include inspection, palpation, percussion, and auscultation. Okay, as you begin your assessment, be sure to watch your client closely for indications of respiratory discomfort.
Methods of Assessment2:09–2:17
Inspection2:17–5:23
These may include facial expressions or other cues, such as a fast respiratory rate. Then, visualize the symmetry and shape of the chest both anteriorly and posteriorly.
The anterior-posterior diameter of the chest should be less than the lateral diameter. When these are equal, it is referred to as barrel chest.
A barrel chest can indicate a chronic respiratory condition, such as chronic obstructive pulmonary disease, or COPD for short, or cystic fibrosis.
You should also inspect the chest, spine, rib cage, sternum, and trachea for structural abnormalities, such as pectus carinatum, also known as pigeon chest, where the sternum bulges outward, and pectus excavatum, or funnel chest, where the sternum is depressed inward.
Other structural abnormalities include scoliosis, where there’s an abnormal sideways curve of the thoracic and lumbar spine; and kyphosis, or an exaggerated outward curvature of the thoracic spine.
Lastly, a deviation of the trachea can be related to thyroid disease, a mediastinal tumor, or pleural effusion. Also observe your client’s respirations, which should be between 12 to 20 breaths per minute.
A respiratory rate over 20 breaths per minute is considered tachypnea and may occur due to anxiety, pain, or infection, whereas a respiratory rate of less than 12 breaths per minute is considered bradypnea and may occur because of an electrolyte imbalance or the effects of opioid medications.
In addition to the respiratory rate, note your client’s respiratory pattern, which should be regular and unlabored. Be sure to assess for signs of acute respiratory distress, including retractions, which occur as a result of airway obstruction, causing the chest wall to “pull in'' at the sternum and between the ribs as the muscles try to overcome the obstruction; and nasal flaring, which occurs when the nostrils widen during inhalation in an attempt to take in as much oxygen as possible.
When assessing for color changes, remember to always consider the natural variations in skin tone. For example, cyanosis in a client with light skin, will appear as blue or purplish coloring.
In clients with a more olive complexion, cyanosis can take on a gray or greenish hue. Next up is palpation.
Check for the presence of crepitus, which is a bubbly or crunchy sensation in the chest that occurs when air is trapped in the subcutaneous tissues, commonly due to an underlying disease such as emphysema.
Palpation5:23–6:34
To feel for crepitus, palpate with the palmar surface of your hands over the anterior and posterior chest. Then, assess for thoracic expansion while the client breathes.
To do this, place your thumbs along the level of the 10th rib on both sides of the spine and lay your palms on the client's back, making a “W” with your hands.
You should also test for tactile fremitus, or the vibrations in the chest that occur when your client speaks. To do this, ask the client to say “99” repeatedly while palpating both sides of their posterior chest.
Decreased or lack of fremitus can mean there’s excess air in the pleural space, like with a pneumothorax; whereas increased fremitus may occur due to fluid in the lungs.
Now let’s move onto percussion, which is used to determine the expansion of the lungs and check for the presence of air and fluid.
Percussion6:34–8:22
To do this, percuss every 4 to 5 centimeters, or 1.5 to 2 inches, over the intercostal spaces, taking care to avoid the ribs, comparing the anterior and posterior chest bilaterally.
When percussing over the lungs, the expected sound is resonance. If instead you hear hyperresonance over the lungs, it can indicate the client has asthma, pneumothorax, or emphysema.
The expected sound over the diaphragm and bones is dullness, so if there’s dullness over the lungs, it might mean the client has atelectasis or a mass.
Percussion can be used to evaluate your client’s diaphragmatic excursion. This is where you measure the movement of the diaphragm during inhalation and exhalation.
Mark this spot with a washable pen or a strip of tape. Instruct your client to take a few normal breaths after you’ve marked the spot.
Mark this spot too, and measure the distance between the marks. The distance should be about 3 to 5 centimeters, or 1 to 2 inches.
The distance can be decreased in conditions like ascites, painful respirations, or emphysema; and is increased in pleural effusion or atelectasis.Lastly, there’s auscultation, which is performed with the diaphragm of your stethoscope.
Auscultation8:22–10:22
If your client is able to, have them sit upright so they can take several deep breaths through their mouth. You’ll begin auscultation at the bases of the lungs, since this is where the majority of pathological conditions take place.
Ensure that you place the diaphragm on the client’s skin directly, and be sure that you’re listening over an intercostal space and not bone.
Listen to each side bilaterally as well as posteriorly and anteriorly. Breath sounds are categorized as vesicular, bronchovesicular, and bronchial.
Lastly, bronchial sounds are high pitched, fairly loud, and heard best over the trachea. Adventitious, or abnormal, breath sounds include crackles, also known as rales, which are popping or crackling sounds caused by the movement of fluid through small air passages or alveoli, or when collapsed airways snap open during inspiration.
Crackles are associated with pulmonary edema or pneumonia. Rhonchi are low-pitched, rumbling sounds caused by air moving over secretions in the larger airways, and can be associated with chronic obstructive pulmonary disease or bronchitis.
Wheezes are high pitched musical sounds caused by airflow through small narrowed airways, most often caused by bronchospasm.
If you hear any adventitious breath sounds, ask your client to cough, and listen again. Now, other abnormal breath sounds include a friction rub, which is a superficial, low pitched grating sound that can happen with inflammation of the pleura.
Then, there’s diminished breath sounds, associated with atelectasis or emphysema; and absent breath sounds, which are associated with pneumothorax or complete airway obstruction.
As the nurse, it’s your responsibility to correctly assess, interpret, report, and document your assessment findings. If your assessment reveals something that’s potentially abnormal or emergent, such as wheezing or diminished breath sounds, you should report this immediately to the healthcare provider, while intervening to ensure effective respirations.
Nursing Implications10:22–10:43
Alright, as a quick recap…. Assessment of the thorax and lungs gives the nurse information about the movement of air and gas exchange.
Review10:43–11:14
Supplies needed for the thorax and lung assessment include a stethoscope, a washable pen or marker, a centimeter ruler, tape, drapes, and a good source of light.
Methods of thorax and chest assessment include inspection, palpation, percussion, and auscultation. As the nurse, it’s your responsibility to correctly assess, interpret, report, and document your assessment findings.
| PHYSICAL ASSESSMENT - THORAX AND LUNGS | ||
| KEY POINTS | NOTES | |
| DEFINITION |
| |
| GETTING STARTED |
| |
| ANATOMICAL LANDMARKS |
| |
| METHODS OF ASSESSMENT |
| |
| INSPECTION |
| |
| PALPATION |
| |
| PERCUSSION |
| |
| AUSCULTATION |
| |
| NURSING IMPLICATIONS |
| |
No notes for this video yet
Try adding a note below